Chain How-To – Part 1
Your chain is arguably the most critical part of your entire bike. Depending on length, they can have more than 400 individual moving parts. Without this lovely piece of engineering, we wouldn’t have the ability to pedal forward, shift gears, and ride these wonderful machines we call bikes (I’m assuming that most of you don’t ride belt drive bikes).
Why then, is there so much controversy surrounding chains? For such a (seemingly) black-and-white topic, there is an astounding amount of perceived ‘chain black magic’. How do they work? Why do they break? What’s the proper way to lube a chain – wax, oil plus additives, sewing machine oil, or something else entirely? And don’t forget the grand daddy of them all: How-in-the-heck do you determine proper chain length?
That last one is what we intend to address with this article. We’ve written about it in the past HERE.
Consider this the updated, expanded, and extra-nerdy version. We will focus primarily on proper chain sizing and installation of most major brands. For the big hairy topic of chain lubrication… well, that’s for another day.
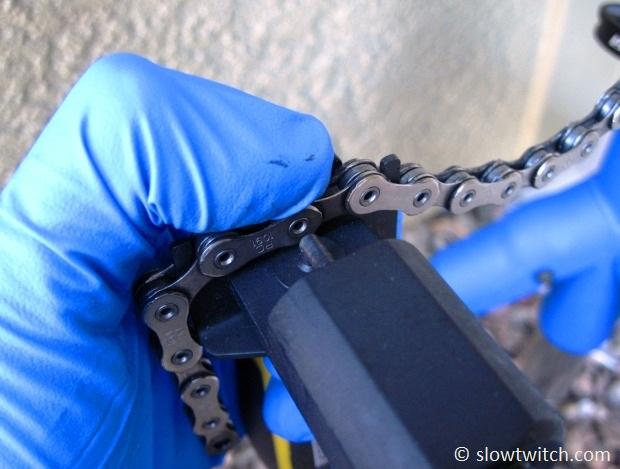
Chain Anatomy
A chain is only as strong as its weakest link, right? Sure, fine. While that’s true, chain manufacturers all strive to make all of their links equally strong. What you may not understand, however, is what a chain looks like when it’s taken all apart. What are the individual parts called, and how do they work? The kind folks at Wippermann Connex lent this graphic to us:
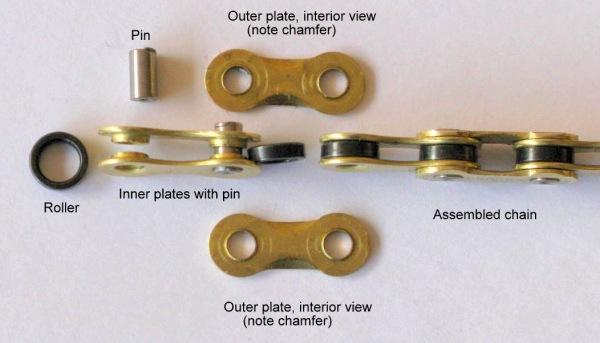
As you can see, there is a lot going on in there. The pins are what hold everything together. The rollers are what actually rest against your chainrings, pulleys, and cassette cogs. The inner and outer plates are the ‘walls’ of the chain. When everything is put together, you’ve got a system that can do all of the wonderful things we want – pedal forward, pedal backward, and shift between gears on our multi-speed bikes.
Note that not all chains end up created equally, however. Most are made primarily of steel, but you can also find some stainless, and even titanium. They also differ in the shaping of the plates, and overall tolerance stack-up. Some chains are more flexible side-to-side than others, which can affect shifting. Each chain manufacturer has their own story, and as with most bike parts, it’s rare that one does best in all situations.
You also have many different widths of chain. Even for drivetrains with the same number of cassette cogs (i.e. 10-speed), there can be small differences in chain width. For example, here are the advertised widths of several 10-speed chains:
Campagnolo: 5.9mm
KMC: 5.88mm
Shimano: 5.88mm
SRAM: 5.95mm
Wippermann: 5.9mm
Over time, I’ve found that – except for Campagnolo – these different chains and drivetrains play nice together. The safe bet is to just use a chain made by your drivetrain manufacturer (i.e. use a Shimano chain on a Shimano drivetrain). If you want to use a non-stock chain, be sure to check that it is compatible with your drivetrain. The most important thing is to double check that, regardless of manufacturer, the chain matches the drivetrain’s cog width. If you have a 10-speed drivetrain, don’t use a 9-speed chain (from ANY manufacturer).
Derailleur Capacity
Chain sizing is undoubtedly one of the most misunderstood aspects of bicycle maintenance. Even among seasoned mechanics, there can be some controversy.
As we’ve written before, you generally want your chain as long as possible – without being so long that the chain sags in the small-small gear combination (smallest cog and smallest chainring).
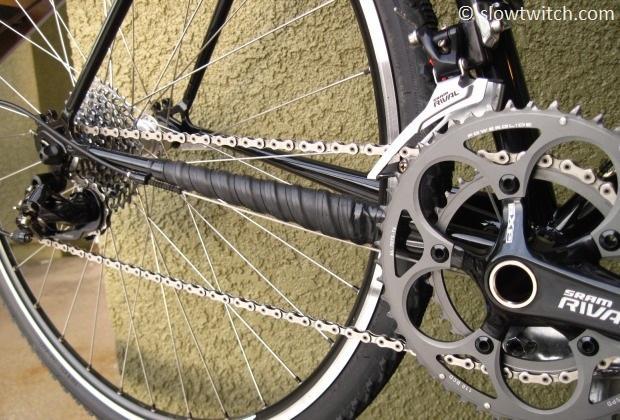
To understand why this is the case, we must first understand what your rear derailleur’s jobs are. First, and most obvious, your rear derailleur shifts between gears on your cassette. Second, and more importantly, it manages chain capacity. You see, your chain isn’t always wrapped around the same number of gear teeth. The least amount of chain your drivetrain will ever require is in the small-small combination. The chain is physically wrapping around fewer gear teeth. The largest amount of chain your drivetrain will ever require is in the big-big combination. It has to wrap all the way around the big ring and all the way around the big cog. The swing of the rear derailleur cage is what makes this all possible.
To illustrate, let’s look at some photos. The series below goes like this:
Top-Left: Small cog and small chainring
Top-Right: Middle cog and small chainring
Bottom-Left: Middle cog and big chainring
Bottom-Right: Big cog and big chainring
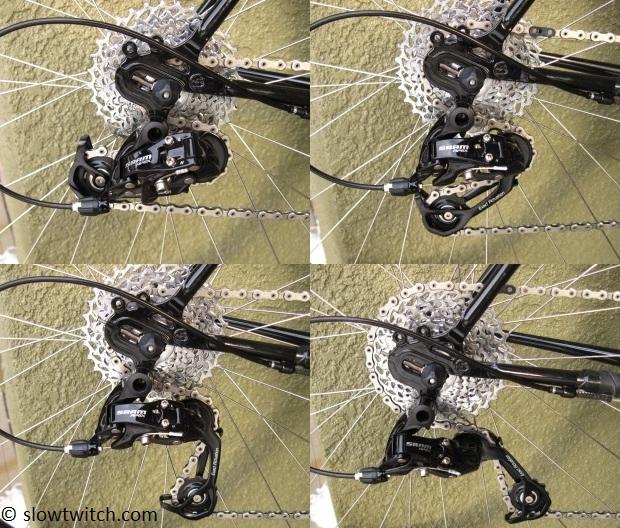
Notice how the derailleur cage becomes more extended – travels further to the right – as the chain wraps around more and more gear teeth.
This also begins to explain why drivetrain manufacturers make different length cages for rear derailleurs. For example, let’s look at two SRAM derailleurs. On the left, we have an Apex mid cage derailleur. On the right, a Rival short cage derailleur.
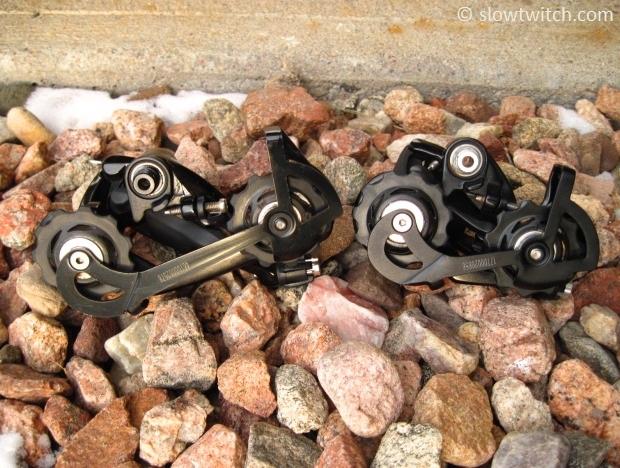
The longer the derailleur cage, the more capacity it has to manage a wider gear range; the cage physically travels a longer arc. Imagine if this derailleur’s cage was as long as the red line:
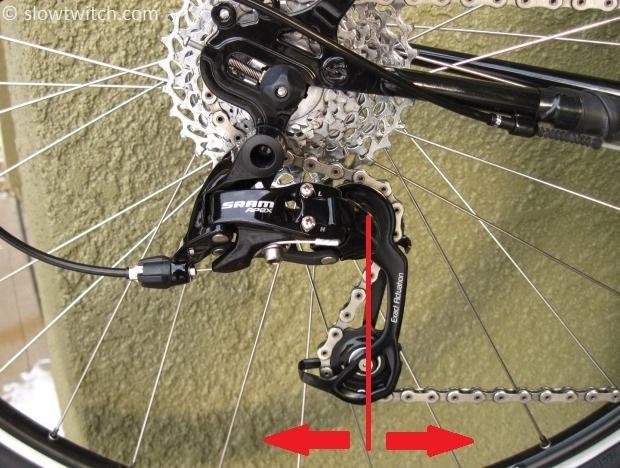
In theory, you could make a derailleur cage as long as you want – until it inevitably hits the ground.
How do you know how long of a cage you need? Without getting in to chain capacity calculations, you simply should understand this:
Bigger difference in size between big chainring and small chainring
AND/OR
Bigger difference in size between big cog and small cog
=
More chain management capacity necessary (longer cage).
Here are two general rules of thumb for determining cage length on road and mountain bikes. For road, you generally want to use a short cage derailleur for a double chainring and any cassette that is 11-28 or smaller. For a road triple crankset, or a double crank with large cassette (i.e. 11-32), use a mid-cage derailleur. On mountain bikes, the simple method is to go by number of chainrings. For a single ring, use a short cage. For a double crankset, use a mid cage. And for a triple crankset, use a long cage.
Why not just use a long cage for everything? You could. The longer derailleur cages can always handle small cassettes and standard rings. The reasons people do not generally do this are 1) Fashion, and 2) A miniscule weight gain with longer cages.
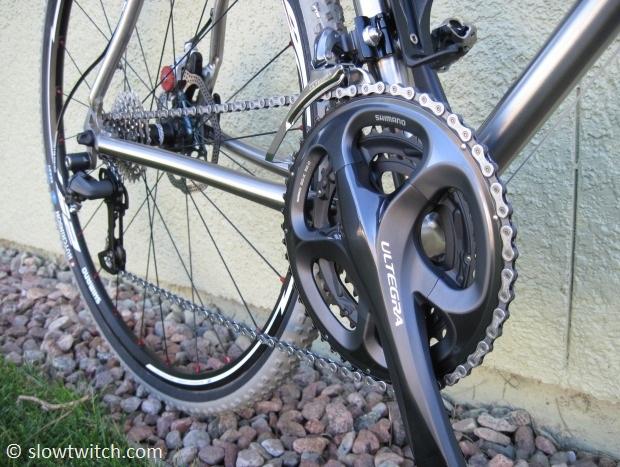
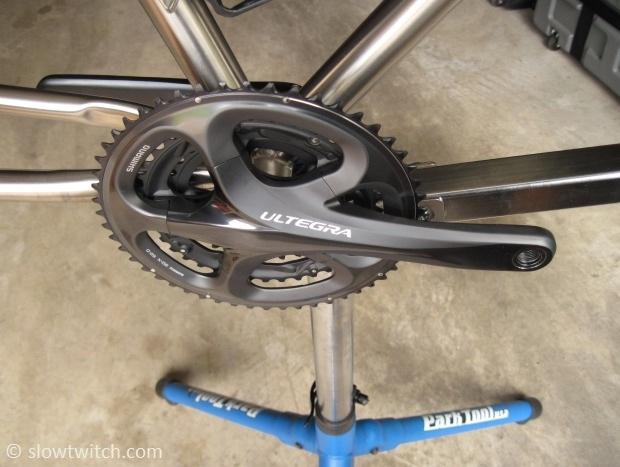
My triple-crankset-equipped cyclocross bike uses an Ultegra mid-cage derailleur:
FINE PRINT:
The simple equations for cage length (above) are not all-inclusive. Specifically, for mountain bikes, you can potentially get in to trouble. You see, some rear suspension geometries make the rear axle travel upwards in an arc. Depending on the design, this can actually increase the effective chainstay length slightly during part of the suspension swing. If you are cutting it close on cage length and/or chain length, that could put you in a sticky situation.
The worst case scenario is this: the chain and derailleur cage are just long enough to ride around the parking lot. Everything is shifting just peachy and all is right with the world. Then you decide to take on a big 15-foot jump. You ride, you jump, and you land. However, when you do land, you fully compress the suspension and take that axle path to its furthest point. All of a sudden, the bike’s chainstay length grew by 1cm, your derailleur cage takes a crap, and the whole derailleur gets torn off the bike. For this reason, some mountain bikers who INSIST on using a short cage derailleur must make their chain too long – so it sags in small-small (and they cannot use that gear).
You can use a short cage derailleur for anything – even on a triple with wide range cassette. You just have to make the chain longer-than-otherwise-necessary, to make up for the derailleur’s lack of gear capacity. Your options are to either make the chain too long, giving you access to the big-big gear (and sacrificing the use of small-small) – or leave the chain too short, and try to remember to never use big-big.
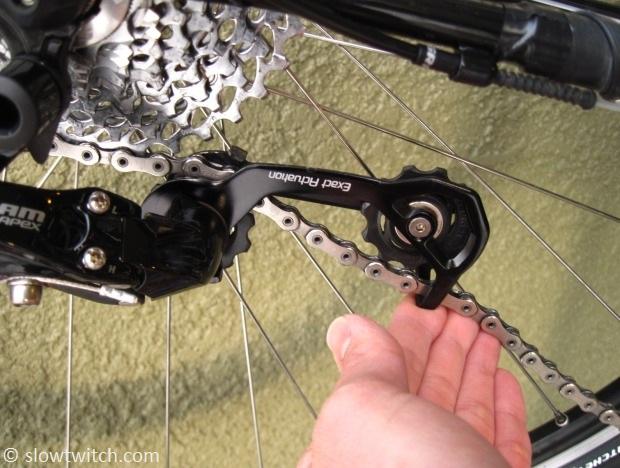
When in doubt, err on the side of a longer cage. An easy way to tell if you need more chain length or derailleur cage length is this: Look at the cage while in big-big. You never want the rear derailleur pulleys to be parallel to the ground (or close to it). In the photo below, I simply used my hand to push the cage up to simulate what it might look like if the derailleur’s capacity was maxed out:
End fine print.
Chain Sizing – Pro Style
So how do we find this perfect chain length? Some special formula? A magic potion combined with a tribal chain dance? You can dance all you want, but there’s an easier way.
After years of wrenching and speaking with great mechanics around the world, there is a single method that most seem to agree on. I’ve met a few hard-headed mechanics who insist that they have a better method of determining chain length, but it A) ends up requiring more work in the long run, or B) ends up at the same length that the ‘standard’ method would anyhow.
To begin, we’ll assume that you have no chain on the bike. Shift both the front and rear derailleurs in to the smallest cog positions. Take your new chain out of the package, and snake it through the front derailleur. There should be no photo necessary for this, because a caveman could do it.
For the rear of the bike, wrap the chain around the small cog, and through the rear derailleur. TAKE NOTE: If this is your first chain replacement, it is a good idea to snap a photo of the rear derailleur with your handy camera phone before you remove the old chain. Believe it or not, but I’ve seen chains get routed incorrectly through a rear derailleur cage, resulting in a completely non-functioning derailleur. My SRAM Apex derailleur routes like this:
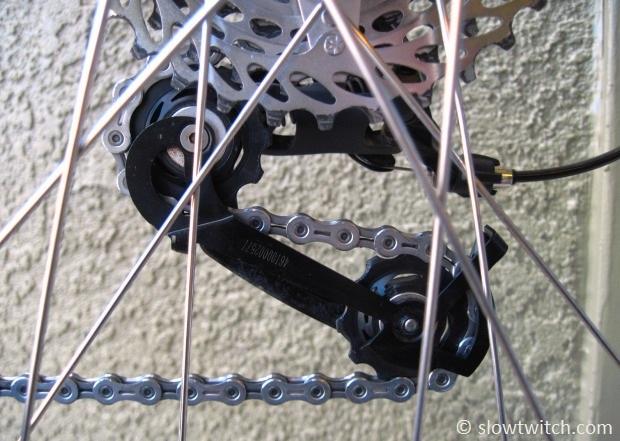
However your derailleur routes – remember it.
Here’s where the magic begins. You’re in small-small. You want to find the appropriate chain length that allows the chain to just clear the rear derailleur cage and pulleys. If the chain is too long, it will look like this:
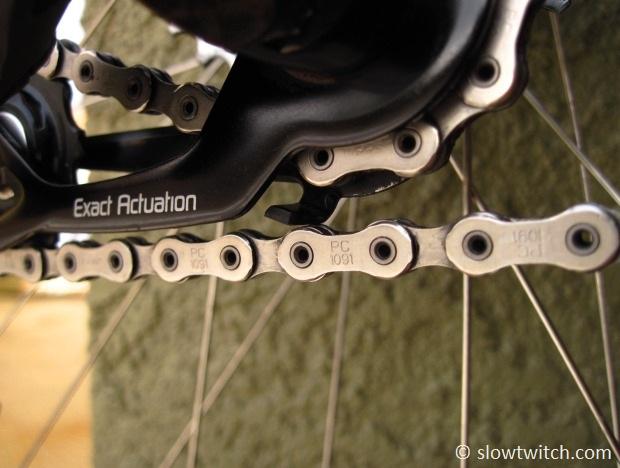
See the contact? That’s bad. That means you can’t use the small-small gear. Of course, you’re not really supposed to use it anyway, but reality knows otherwise (people do it).
You manipulate the chain length simply by holding it in your hands and pulling on the left half (this will pull the bottom pulley down). Pull it to where the chain slightly clears everything – like this:
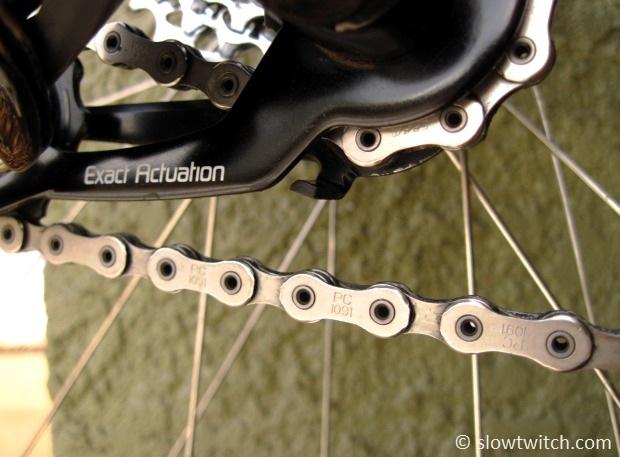
Let me say this clearly so we all understand: THAT’S IT! That’s how you size a chain properly. Assuming you have the correct length of rear derailleur cage for your gear choices, this method will leave you with access to all of your gears – and no broken derailleurs. All we need to do now is trim the length with a chain tool, which we’ll cover in another segment of this article.
There is one final rub. Depending on your drivetrain, you can sometimes get away with a chain that is slightly shorter than the method above. If you only plan on using an 11-23 cassette with your 53/39 chainrings – and NEVER use any other cassette, there is a good chance you could make the chain slightly shorter, without risking any problems. This is where some of the hard-headed mechanics and manufacturers start arguing with me. “A shorter chain is lighter and faster! You should optimize the chain length for your cassette size!”
I think Scrooge said it best – Bah, Humbug! Go ahead and make your chain shorter, and save a sneeze worth of weight. But, if you ever decide to use a larger cassette (i.e. 11-28), you MUST put a longer chain on the bike. Most triathletes I know have a hard enough time remembering to lube their chain and pump up their tires, let alone keep track of the number of links in their chain. There are too many other fish to fry.
My advice is this: Use the correct length derailleur cage, size the chain with the standard method, and go ride your bike.
In part two of this article, we will cover the particulars of installing several different brands of chain. While most follow the same basic steps, there are a few details worth noting to ensure a happy drivetrain.


Start the discussion at forum.slowtwitch.com